вторник, 23 ноября 2010 г.

Настраиваем почтовый клиент в MS SQL

How to configure SQL 2005 Database Mail sp_send_dbmail

What is SQL 2005 Database Mail? Before Microsoft has introduced SQL Server 2005 to database administrators and database developers, administrators and programmers were suffering in their applications just because of the lack of SMTP email support in their SQL Server databases when a need or a requirement occurs to send emails from database.

The requirement to send email may occur when a job fails, or in the code you want to send email in your stored procedures or in the sql codes of triggers in certain situations.

Now, Microsoft SQL Server 2005 supports SMTP with a new feature named Database Mail so SQL database administrators do not need to install MS Outlook, or MAPI or any other third party mailing tools to send emails from within the SQL Server database.

Database Mail is just one of the enhancements we were introduced with the new version of SQL Server, SQL Server 2005.
If you are looking for sp_send_dbmail syntax and t-sql sp_send_dbmail examples, please refer to tsql tutorial SQL Server Database Mail sp_send_dbmail Example.

Now we can continue to configuration steps and processes of SQL Server 2005 Database Mail.

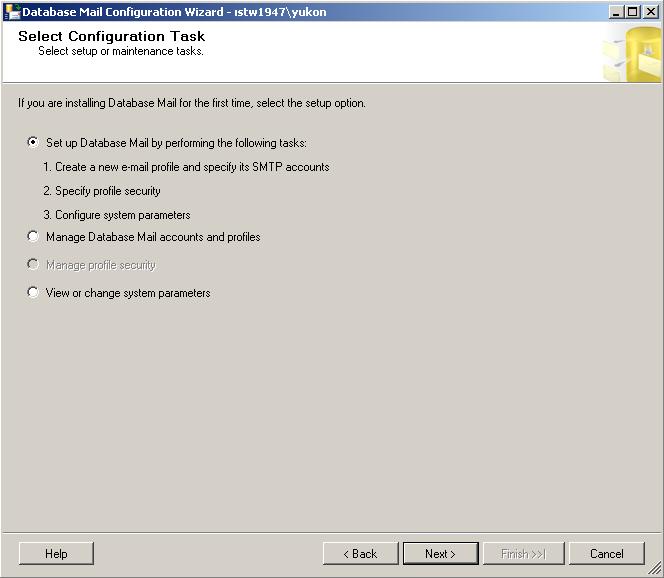
Configuration Steps of SQL Server 2005 Database Mail

database-mail

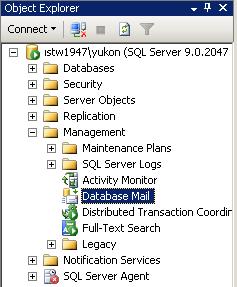
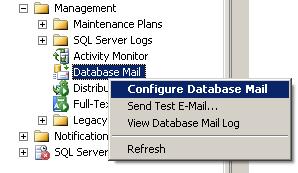
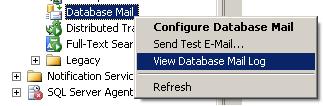
Right click on the Database Mail in order to display the context menu and select the Configure Database Mail menu item.

configure-database-mail

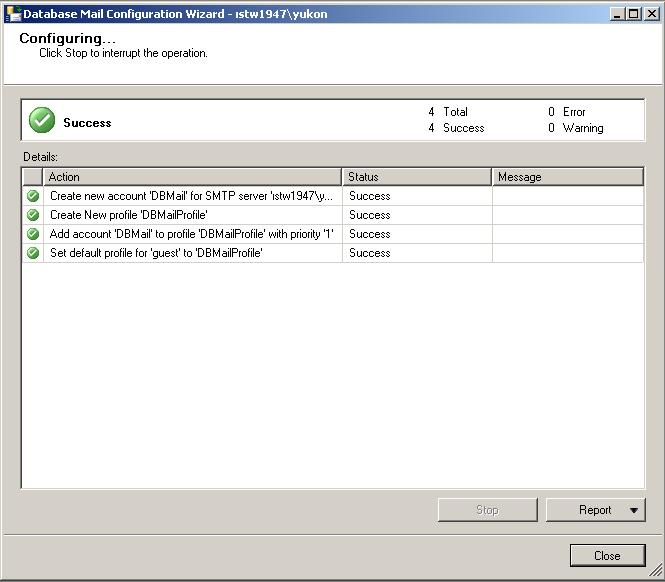
Database Mail Configuration Wizard runs and displays a welcome message.

Database Mail Configuration Wizard is used to enable Database Mail, manage security, and configure Database Mail system parameters

configuration-task

When you click Next

database-mail-feature

TITLE: Microsoft SQL Server Management Studio
------------------------------

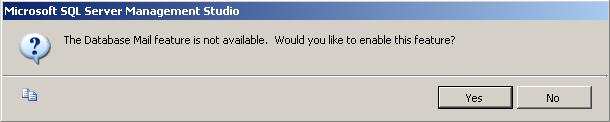
The Database Mail feature is not available. Would you like to enable this feature?

You can enable the Database Mail feature by pressing the "Yes" button or by running the below sql sp_configure mail script

USE Master
GO
sp_configure 'show advanced options', 1
GO
reconfigure with override
GO
sp_configure 'Database Mail XPs', 1
GO
reconfigure
GO
sp_configure 'show advanced options', 0
GO

Configuration option 'show advanced options' changed from 1 to 1. Run the RECONFIGURE statement to install.
Configuration option 'Database Mail XPs' changed from 0 to 1. Run the RECONFIGURE statement to install.
Configuration option 'show advanced options' changed from 1 to 0. Run the RECONFIGURE statement to install.

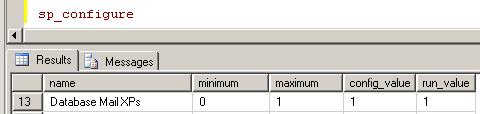
If you run sp_configure command on the master database, you will see that the run_value for the "Database Mail XPs" is changed from 0 to 1 to enable this feature.

sp_configure

sp_configure

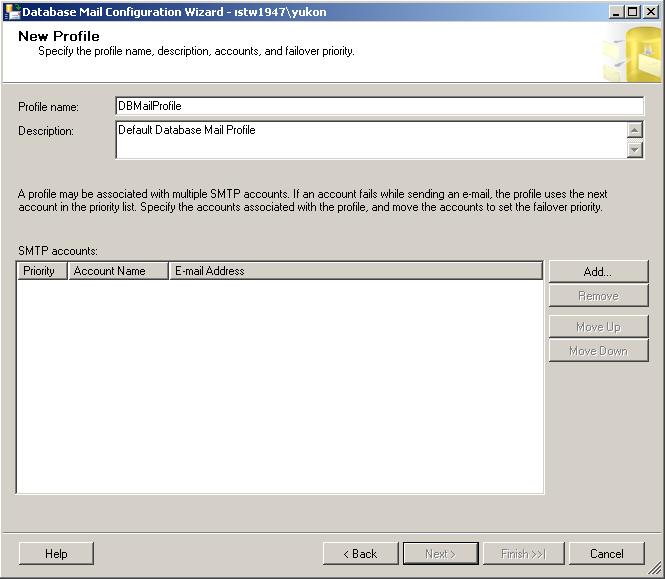
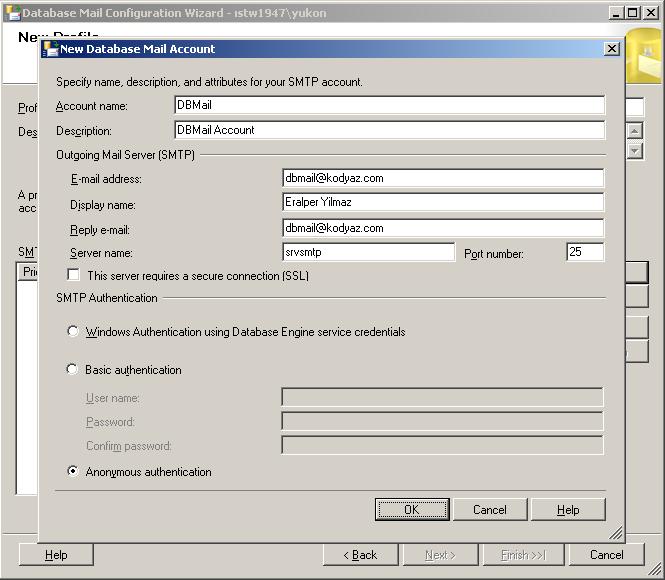
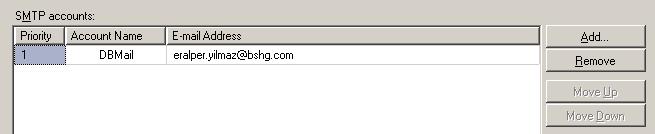
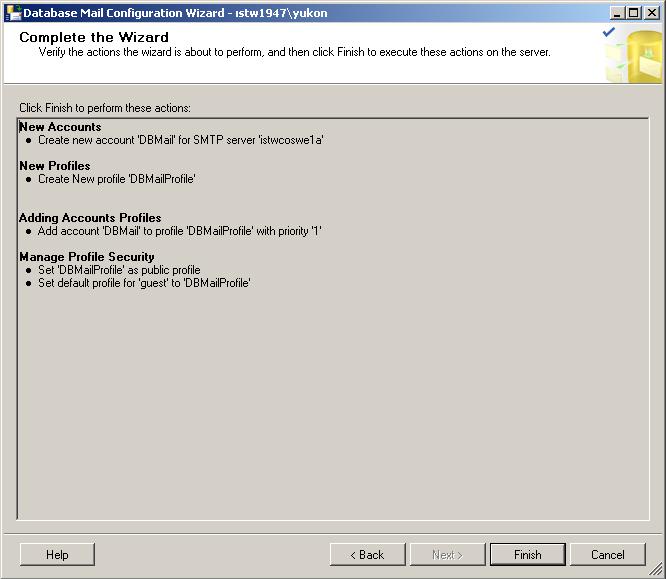
First step is creating a new profile. Enter a profile name and a description for the new profile. Then click the Add... button to complete the task.

database-mail-profile

database-mail-account

smtp-accounts

Click Next button

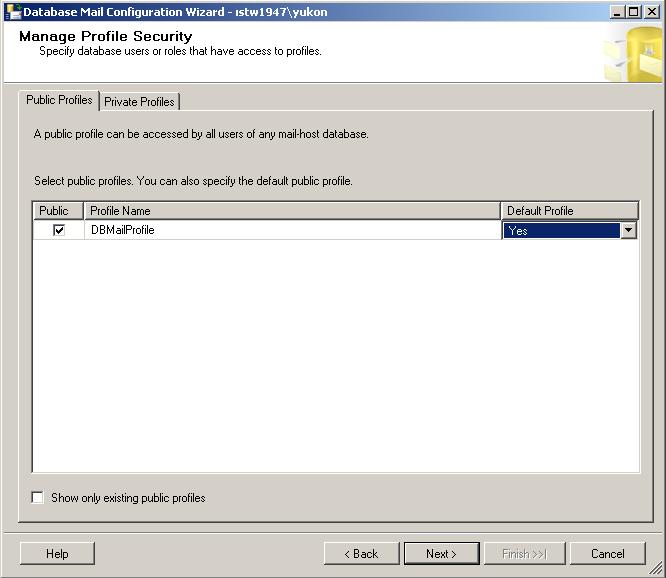
Use this page to configure a public profile.

Profiles are either public or private. A private profile is accessible only to specific users or roles. A public profile allows any user or role with access to the mail host database (msdb) to send e-mail using that profile.

A profile may be a default profile. In this case, users or roles can send e-mail using the profile without explicitly specifying the profile. If the user or role sending the e-mail message has a default private profile, Database Mail uses that profile. If the user or role has no default private profile, sp_send_dbmail uses the default public profile for the msdb database. If there is no default private profile for the user or role and no default public profile for the database, sp_send_dbmail returns an error. Only one profile can be marked as the default profile

To send Database Mail users must also be a added to the DatabaseMailUsersRole database role in the msdb database using Management Studio or sp_addrolemember.

mail-profile-security

Use this page to configure a private profile.

Profiles are either public or private. A private profile is accessible only to specific users or roles. A public profile allows any user or role with access to the mail host database (msdb) to send e-mail using that profile.

A profile may be a default profile. In this case, users or roles can send e-mail using the profile without explicitly specifying the profile. If the user or role sending the e-mail message has a default private profile, Database Mail uses that profile. If the user or role has no default private profile, sp_send_dbmail uses the default public profile for the msdb database. If there is no default private profile for the user or role and no default public profile for the database, sp_send_dbmail returns an error.

Note:
To send Database Mail users must also be a added to the DatabaseMailUsersRole database role in the msdb database using Management Studio or sp_addrolemember.

configure-system-parameters

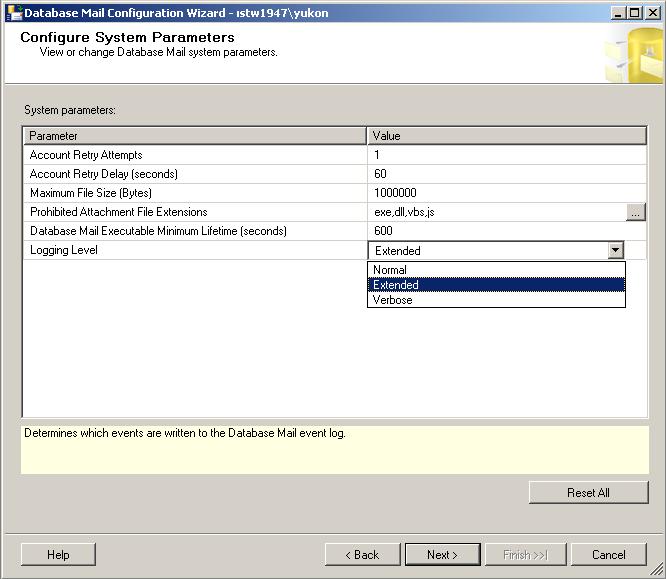
Use this page to specify Database Mail system parameters. View the system parameters and the current value of each parameter. Select a parameter to view a short description in the information pane.

Options
Account Retry Attempts
The number of times that the external mail process attempts to send the e-mail message using each account in the specified profile.

Account Retry Delay (seconds)
The amount of time, in seconds, for the external mail process to wait after it tries to deliver a message using all accounts in the profile before it attempts all accounts again.

Maximum File Size (Bytes)
The maximum size of an attachment, in bytes.

Prohibited Attachment File Extensions
A comma-separated list of extensions which cannot be sent as an attachment to an e-mail message. Click the browse button (...) to add additional extensions.

Database Mail Executable Minimum Lifetime (seconds)
The minimum amount of time, in seconds, that the external mail process remains active. The process remains active as long as there are e-mails in the Database Mail queue. This parameter specifies the time the process remains active if there are no messages to process.

Logging level
Specify which messages are recorded in the Database Mail log. Possible values are:

Normal - logs only errors
Extended - logs errors, warnings, and informational messages
Verbose - logs errors, warnings, informational messages, success messages, and additional internal messages. Use verbose logging for troubleshooting.

Default value is Extended.

Reset All
Select this option to reset the values on the page to the default values.

Additional Information about the Retry Options
The sequence number in the Database Mail profile determines the order in which Database Mail uses accounts in the profile. This is configured by using the Move Up and Move Down buttons when configuring a profile in the Database Mail Configuration Wizard. For a new e-mail message, Database Mail starts with the account that has the lowest sequence number. Should that account fail, Database Mail uses the account with the next highest sequence number, and so on until either Database Mail sends the message successfully, or the account with the highest sequence number fails. If the account with the highest sequence number fails, the Database Mail pauses attempts to send the mail for the amount of time configured in the Account Retry Delay parameter of sysmail_configure_sp, then starts the process of attempting to send the mail again, starting with the lowest sequence number. Use the Account Retry Attempts parameter of sysmail_configure_sp, to configure the number of times that the external mail process attempts to send the e-mail message using each account in the specified profile.

If more than one account exists with the same sequence number, Database Mail will only use one of those accounts for a given e-mail message. In this case, Database Mail makes no guarantees as to which of the accounts is used for that sequence number or that the same account is used from message to message.

dbmail-wizard

process

Run the below sql command from a query editor.

EXEC msdb.dbo.sp_send_dbmail @profile_name = 'DBMailProfile', @recipients = 'recipient@mail.com', @body = 'This is a sample email sent via Database Mail from a t-sql code script', @subject = 'Subject: Database Mail'

"Mail queued." response will be returned.

database-mail-menu-items

If you run the sp_send_dbmail stored procedure before enabling the Database Mail feature, you will get a response similar to below.

Msg 15281, Level 16, State 1, Procedure sp_send_dbmail, Line 0
SQL Server blocked access to procedure 'dbo.sp_send_dbmail' of component 'Database Mail XPs' because this component is turned off as part of the security configuration for this server. A system administrator can enable the use of 'Database Mail XPs' by using sp_configure. For more information about enabling 'Database Mail XPs', see "Surface Area Configuration" in SQL Server Books Online.

In such a case use sp_configure to set Database Mail XPs properties or enable the Database Mail feature using the Configure Database Mail Wizard.

If you enabled the database mail but getting the below error message, you might be using a wrong profile name in the sp_send_dbmail command.

Msg 14607, Level 16, State 1, Procedure sysmail_verify_profile_sp, Line 42
profile name is not valid

In this case, run the Configure Database Mail Wizard. Then select "Manage Database Mail accounts and profiles" option in the Select Configuration Task

manage-database-mail-accounts-and-profiles

Then select,

view-change-delete-existing-account

In the manage existing account screen, choose from existing accounts to manage from the dropdown list.

sp_send_dbmail Example T-SQL Code

After SQL Server administrators enable and configure Database Mail sp_send_dbmail can be used in t-sql program codes like stored procedures, triggers, etc.
SQL developers and admins can find tsql example sp_send_dbmail code at t-sql tutorial SQL Server Database Mail sp_send_dbmail Example.
Using sp_send_dbmail, sql developers can send emails to multiple recipients in HTML format.

Ошибки репликации - на почту

Для того, чтобы ошибки репликации отсылались на почту можно использовать следующую хранимку:

CREATE PROCEDURE sp_replication_errors
AS
BEGIN

IF OBJECT_ID('tempdb.dbo.##replication_errors') IS NOT NULL
DROP TABLE ##replication_errors

SELECT
errors.agent_id,
errors.last_time,
agentinfo.name,
agentinfo.publication,
agentinfo.subscriber_db,
error_messages.comments AS ERROR
INTO ##replication_errors
FROM
--find our errors; note that a runstatus 3 can be the last message, even if it's actually idle and good
(SELECT agent_id, MAX(TIME) AS last_time FROM distribution.dbo.MSdistribution_history with (nolock)
WHERE (runstatus IN (3,5,6) AND comments NOT LIKE '%were delivered.') --AND comments NOT LIKE '
or (runstatus = 4 and comments like 'The initial snapshot%is not yet available.')
GROUP BY agent_id) errors
FULL outer JOIN
(SELECT agent_id, MAX(TIME) AS last_time FROM distribution.dbo.MSdistribution_history with (nolock)
WHERE (runstatus IN (1,2,4) and comments not like 'The initial snapshot %is not yet available.')
OR comments LIKE '%were delivered.' GROUP BY agent_id
) clean
ON errors.agent_id = clean.agent_id
--grab the agent information
LEFT OUTER JOIN distribution.dbo.MSdistribution_agents agentinfo
ON agentinfo.id = errors.agent_id
--and the actual message we'd see in the monitor
LEFT OUTER JOIN distribution.dbo.MSdistribution_history error_messages
ON error_messages.agent_id = errors.agent_id AND error_messages.time = errors.last_time
where errors.last_TIME > ISNULL(clean.last_time,'20100101')
AND comments NOT LIKE '%TCP Provider%'
AND comments NOT LIKE '%Delivering replicated transactions%'
AND name NOT LIKE '%suckyservername%'

IF (SELECT COUNT(*) FROM ##replication_errors) > 0
EXEC msdb.dbo.sp_send_dbmail
@profile_name = 'DBMailProfile',
@recipients = 'test@mail.ru',
@subject = 'Replication errors on REPL server'
,@query = 'select * from ##replication_errors'
,@query_result_header = 0

DROP TABLE ##replication_errors
END
GO


Перед этим стоит запустить:
use master
go
sp_configure 'show advanced options',1
go
reconfigure with override
go
sp_configure 'Database Mail XPs',1
--go
--sp_configure 'SQL Mail XPs',0
go
reconfigure
go

пятница, 12 ноября 2010 г.

Если не выполняется xp_cmdshell

1. When I ran the script for the first time, I received the following error:
SQL Server blocked access to procedure 'sys.sp_OACreate' of component 'Ole Automation Procedures' because this component is turned off as part of the security configuration for this server. A system administrator can enable the use of 'Ole Automation Procedures' by using sp_configure. For more information about enabling 'Ole Automation Procedures', see "Surface Area Configuration" in SQL Server Books Online.

To resolve it, run the following SQL commands:
USE master
GO
sp_configure
'show advanced options', 1;
GO
RECONFIGURE;
GO
sp_configure 'Ole Automation Procedures', 1;
GO
RECONFIGURE;
GO

2. I then received error:
SQL Server blocked access to procedure 'sys.xp_cmdshell' of component 'xp_cmdshell' because this component is turned off as part of the security configuration for this server. A system administrator can enable the use of 'xp_cmdshell' by using sp_configure. For more information about enabling 'xp_cmdshell', see "Surface Area Configuration" in SQL Server Books Online.

To resolve it, run the following SQL commands:
USE master
GO
EXEC sp_configure 'show advanced options', 1
GO
RECONFIGURE WITH OVERRIDE
GO
EXEC sp_configure 'xp_cmdshell', 1
GO
RECONFIGURE WITH OVERRIDE
GO
EXEC sp_configure 'show advanced options', 0
GO

среда, 1 сентября 2010 г.

Даем группе public Доступ

declare @table_name nvarchar(100), @sql_select nvarchar(1000)

declare sql_script cursor for
select table_name
from information_schema.tables t
where table_name not in(select distinct table_name from information_schema.table_privileges where grantee ='public')
order by table_name

open sql_script
fetch next from sql_script
into @table_name

while @@fetch_status = 0 begin
set @sql_select = 'GRANT SELECT, UPDATE, DELETE, INSERT, REFERENCES ON '+rtrim(@table_name)+' TO PUBLIC'
exec(@sql_select)

fetch next from sql_script
into @table_name
end

close sql_script
deallocate sql_script

четверг, 12 августа 2010 г.

Список таблиц, у которых нет доступа для public

select *
from information_schema.tables t

where table_name not in
(select distinct table_name from information_schema.table_privileges where grantee ='public')

and table_name not in('dtproperties','MSreplication_objects','MSreplication_subscriptions',
'MSsavedforeignkeycolumns','MSsavedforeignkeyextendedproperties','MSsavedforeignkeys',
'MSsnapshotdeliveryprogress')
order by table_name

четверг, 5 августа 2010 г.

Изменяем collation таблиц

CREATE PROCEDURE [dbo].[sp_collation] AS

DECLARE
@table_name NVARCHAR(100), @column_name NVARCHAR(100), @data_type NVARCHAR(50),
@character_max integer, @sql_select NVARCHAR(1000), @id integer, @column_text NVARCHAR(1000),
@res NVARCHAR(3000), @table_name_old NVARCHAR(100)
CREATE TABLE t(id integer NULL, column_text NVARCHAR(1000) NULL)
CREATE TABLE result(sql NVARCHAR(3000) NULL)

DECLARE sql_script1 CURSOR FOR
SELECT
table_name, column_name, data_type,CHARacter_maximum_length
FROM information_schema.columns
WHERE data_type IN('varchar','nvarchar','char','nchar','text','ntext')
--and table_name = 'table_name'

SET @table_name_old =''

OPEN sql_script1
FETCH next FROM sql_script1
INTO @table_name, @column_name, @data_type, @character_max

WHILE @@fetch_status = 0 BEGIN
IF
@table_name_old <> @table_name
BEGIN
SET
@sql_select = 'Alter table '+RTRIM(@table_name)+' add ID numeric(18,0) NOT NULL IDENTITY (1, 1)'
EXEC(@sql_select)
IF @table_name_old <> ''
BEGIN
INSERT INTO
result
SELECT 'Alter table '+RTRIM(@table_name_old)+' drop column ID'
END
END

INSERT INTO
result
SELECT 'Alter table '+RTRIM(@table_name)+' alter column '+RTRIM(@column_name) +' '+
RTRIM(@data_type)+'('+RTRIM(CAST(@character_max AS NVARCHAR(5)))+') collate Cyrillic_General_CI_AS'
--print @column_name
SET @sql_select = 'insert into t select id, '+RTRIM(@column_name)+' from '+RTRIM(@table_name)
EXEC(@sql_select)

DECLARE sql_script2 CURSOR FOR
SELECT
id,column_text FROM t ORDER BY id
OPEN sql_script2
FETCH next FROM sql_script2 INTO @id, @column_text

WHILE @@fetch_status = 0 BEGIN
IF
@column_text IS NOT NULL
BEGIN
INSERT INTO
result
SELECT 'update '+RTRIM(@table_name)+' set '+RTRIM(@table_name)+'.'+
RTRIM(@column_name)+'= N'''+RTRIM(@column_text)+''' where id ='+RTRIM(CAST(@id AS NVARCHAR(18)))
IF ((@id+0.00)/2000.00 - CAST((@id+0.00)/2000.00 AS integer) = 0) AND (@id > 1999)
BEGIN
INSERT INTO
result
SELECT 'GO'
END
END

FETCH
next FROM sql_script2 INTO @id, @column_text
END
DEALLOCATE
sql_script2

DELETE FROM t
SET @table_name_old = @table_name
FETCH next FROM sql_script1
INTO @table_name, @column_name, @data_type, @character_max
END
DEALLOCATE
sql_script1
INSERT INTO result
SELECT 'Alter table '+RTRIM(@table_name_old)+' drop column ID'

SELECT * FROM result

DROP TABLE t
DROP TABLE result

среда, 21 июля 2010 г.

Расшифровка запароленной храниной процедуры SQL

if exists (select * from sysobjects where id = object_id(N'procDecryptObject2005')
and xtype in (N'P'))
DROP PROCEDURE procDecryptObject2005

GO


CREATE PROCEDURE procDecryptObject2005
(
@Schema NVARCHAR(128)=N'dbo',
@ObjectName NVARCHAR(128)=N'myproc'
) AS
BEGIN

DECLARE @i INT
DECLARE @ObjectDataLength INT
DECLARE @ContentOfEncryptedObject NVARCHAR(MAX)
DECLARE @ContentOfDecryptedObject NVARCHAR(MAX)
DECLARE @ContentOfFakeObject NVARCHAR(MAX)
DECLARE @ContentOfFakeEncryptedObject NVARCHAR(MAX)
DECLARE @ObjectType NVARCHAR(128)
DECLARE @ObjectID INT

SET NOCOUNT ON

SET @ObjectID = OBJECT_ID('[' + @Schema + '].[' + @ObjectName + ']')

-- Check that the provided object exists in the database.
IF @ObjectID IS NULL
BEGIN
RAISERROR('The object name or schema provided does not exist in the database', 16, 1)
RETURN
END

-- Check that the provided object is encrypted.
IF NOT EXISTS(SELECT TOP 1 * FROM syscomments WHERE id = @ObjectID AND encrypted = 1)
BEGIN
RAISERROR('The object provided exists however it is not encrypted. Aborting.', 16, 1)
RETURN
END

-- Determine the type of the object
IF OBJECT_ID('[' + @Schema + '].[' + @ObjectName + ']', 'PROCEDURE') IS NOT NULL
SET @ObjectType = 'PROCEDURE'
ELSE
IF OBJECT_ID('[' + @Schema + '].[' + @ObjectName + ']', 'TRIGGER') IS NOT NULL
SET @ObjectType = 'TRIGGER'
ELSE
IF OBJECT_ID('[' + @Schema + '].[' + @ObjectName + ']', 'VIEW') IS NOT NULL
SET @ObjectType = 'VIEW'
ELSE
SET @ObjectType = 'FUNCTION'

-- Get the binary representation of the object- syscomments no longer holds
-- the content of encrypted object.
SELECT TOP 1 @ContentOfEncryptedObject = imageval
FROM sys.sysobjvalues
WHERE objid = OBJECT_ID('[' + @Schema + '].[' + @ObjectName + ']')
AND valclass = 1 and subobjid = 1

SET @ObjectDataLength = DATALENGTH(@ContentOfEncryptedObject)/2


-- We need to alter the existing object and make it into a dummy object
-- in order to decrypt its content. This is done in a transaction
-- (which is later rolled back) to ensure that all changes have a minimal
-- impact on the database.
SET @ContentOfFakeObject = N'ALTER ' + @ObjectType + N' [' + @Schema + N'].[' + @ObjectName + N'] WITH ENCRYPTION AS'

WHILE DATALENGTH(@ContentOfFakeObject)/2 < @ObjectDataLength BEGIN IF DATALENGTH(@ContentOfFakeObject)/2 + 4000 < @ObjectDataLength SET @ContentOfFakeObject = @ContentOfFakeObject + REPLICATE(N'-', 4000) ELSE SET @ContentOfFakeObject = @ContentOfFakeObject + REPLICATE(N'-', @ObjectDataLength - (DATALENGTH(@ContentOfFakeObject)/2)) END -- Since we need to alter the object in order to decrypt it, this is done -- in a transaction SET XACT_ABORT OFF BEGIN TRAN EXEC(@ContentOfFakeObject) IF @@ERROR <> 0
ROLLBACK TRAN

-- Get the encrypted content of the new "fake" object.
SELECT TOP 1 @ContentOfFakeEncryptedObject = imageval
FROM sys.sysobjvalues
WHERE objid = OBJECT_ID('[' + @Schema + '].[' + @ObjectName + ']')
AND valclass = 1 and subobjid = 1

IF @@TRANCOUNT > 0
ROLLBACK TRAN

-- Generate a CREATE script for the dummy object text.
SET @ContentOfFakeObject = N'CREATE ' + @ObjectType + N' [' + @Schema + N'].[' + @ObjectName + N'] WITH ENCRYPTION AS'

WHILE DATALENGTH(@ContentOfFakeObject)/2 < @ObjectDataLength BEGIN IF DATALENGTH(@ContentOfFakeObject)/2 + 4000 < @ObjectDataLength SET @ContentOfFakeObject = @ContentOfFakeObject + REPLICATE(N'-', 4000) ELSE SET @ContentOfFakeObject = @ContentOfFakeObject + REPLICATE(N'-', @ObjectDataLength - (DATALENGTH(@ContentOfFakeObject)/2)) END SET @i = 1 --Fill the variable that holds the decrypted data with a filler character SET @ContentOfDecryptedObject = N'' WHILE DATALENGTH(@ContentOfDecryptedObject)/2 < @ObjectDataLength BEGIN IF DATALENGTH(@ContentOfDecryptedObject)/2 + 4000 < @ObjectDataLength SET @ContentOfDecryptedObject = @ContentOfDecryptedObject + REPLICATE(N'A', 4000) ELSE SET @ContentOfDecryptedObject = @ContentOfDecryptedObject + REPLICATE(N'A', @ObjectDataLength - (DATALENGTH(@ContentOfDecryptedObject)/2)) END WHILE @i <= @ObjectDataLength BEGIN --xor real & fake & fake encrypted SET @ContentOfDecryptedObject = STUFF(@ContentOfDecryptedObject, @i, 1, NCHAR( UNICODE(SUBSTRING(@ContentOfEncryptedObject, @i, 1)) ^ ( UNICODE(SUBSTRING(@ContentOfFakeObject, @i, 1)) ^ UNICODE(SUBSTRING(@ContentOfFakeEncryptedObject, @i, 1)) ))) SET @i = @i + 1 END -- PRINT the content of the decrypted object PRINT(@ContentOfDecryptedObject) END

Настройка репликации sql 2005

1. Создаем Aliases
Открываем Microsoft SQL Server 2005 \Configuration Tools \SQL Server Configuration Manager.

На всякий случай проверяем, открыты ли именованные каналы – SQL Server 2005 Network Configuration\ Protocols for MSSQLSERVER. Нам нужно, чтобы и Named Pipes и TCP/IP были Enabled. Помимо этого в SQL Native Client Configuration/Client Protocols Named Pipes и TCP/IP также должны быть Enabled.
Обратите внимание, что после этих действий обязательно нужно перезапустить службы: SQL Server 2005 Services – SQL Server (MSSQLSERVER) и SQL Server Agent(MSSQLSERVER).

Заходим на вкладку Native Client Configuration/Aliases. Выбираем New Alias и пишем все так, как показано на рисунке:

2. Создаем Linked Server. Теперь заходим в Microsoft SQL Server Management Studio. Выбираем вкладку – Objects\ Linked Servers. Выбираем New Linked Server

На вкладке General указываем следующие значения:
Linked Server – VPN (имя нашего коннекта)
Server Type
Other data source
Product Name – sql_server (волшебные слова – менять не рекомендуется)
Provider – SQL Native Client
Data Source – х.х.х.х (ip-адрес сервера, к которому мы коннектимся)

Переходим на вкладку – Security. Здесь выбираем галочку «Be made using security context» и указываем
Remote login – sa
With password – пароль sa (в БД, куда реплицируем данные):
И, наконец, переходим на вкладку Server Options. Здесь выставляем значения в True: Rpc, Rpc Out, Use Remote Collation:
Теперь нажимаем “OK” и видим, что в закладке Objects\ Linked Servers появилась новая запись – VPN:
Если сейчас запустить запрос: use master; select * from sys.server - то в качестве результата мы получим две строки: имя нашего сервера и VPN.

Настройка репликации

1. Предварительная подготовка реплицируемых данных. Так как вставка значений в столбцы счетчиков (идентифицирующие столбцы) невозможна, необходимо в таблицах подписчика, участвующих в репликации, установить для таких столбцов значение свойства "Не для репликации" - Да:
Если в вашей БД нет автоинкрементных полей, то данный пункт настройки можно смело пропустить.

2. Проверка правильности имен серверов, участвующих в репликации.
В репликации возможно использование только настоящих имен серверов. Если после установки имя сервера менялось или при попытке настройки репликации возникает ошибка: "В репликации SQL Server необходимо настоящее имя сервера для соединения с ним. Соединение с использованием псевдонима сервера, IP-адреса или любого другого имени не поддерживается. Укажите настоящее имя сервера, "server_name"" необходимо выполнить следующую проверку:

select @@servername
select serverproperty('servername')

Если запросы вернули разные результаты, необходимо выполнить:

exec sp_dropserver 'oldname', 'droplogins'
exec sp_addserver 'newname', 'local'

После чего перезапустить службу SQL Server.

3. Настройка распространителя. Для настройки распространителя необходимо открыть Microsoft SQL Server Management Studio и в контекстном меню пункта Replication выбрать Configure Distibution. Далее необходимо выбрать сервер, который будет использоваться качестве дистрибьютера (тот, с которого будет браться информация):
Теперь указываем каталог моментальных снимков. Каталог должен быть сетевым и на него должны быть настроены соответствующие права. Для этого создаем на диске C:\ папку Repl и делаем ее доступной (shared):
Теперь SQL Server хочет создать базу Distribution. Для этого ему нужно имя и место расположение файлов базы данных распространителя – оставим по-умолчанию:
Нажимаем далее и попадаем в окно, где нужно указать сервер, который будет являться издателем:
И под конец указываем, что «да, создаем БД distribution» и «Да, давайте создадим SQL Script»
Указываем, куда мы будем сохранить файл со скриптом:
И попадаем в окно, где нам показывают все, что мы хотим сделать. Смело нажимаем «Finish», и видим, что действительно все хорошо:
4. Удаление старой репликации. Если вдруг осталась старая репликация (ну, может быть кому-то не захотелось переставлять windows перед установкой SQL Server’a), нужно ее удалить. Для этого выполняем запрос:
Sp_removedbreplication
@db_name = ‘имя вашей БД’
@type = ‘tran’
После того, как нам написали, что все благополучно удалилось продолжаем.

5. Настройка публикации Указываем БД, которая будет использоваться качестве распространителя. Для этого нажимаем правой кнопкой мыши на закладку Replication и выбираем publisher properties. На закладке Publication Databases отмечаем галочкой нужную БД (в столбце Transactional):
6. Создаем публикацию В контекстном подменю закладки Publication\Local Publication выбираем New Publication. Далее указываем БД, которая у нас будет распространять данные:
Во втором окне мастера указываем тип публикации – transactional publication
Теперь указываем объекты, которые будем реплицировать. В нашем случае это будут таблицы и индексированные представления. Создадим отдельные публикации на таблицы и представления.
Для первой публикации отмечаем views: v_kontr_2 и v_kontr_bank_2. (Отметим, что каждый из view's представляет собой выборку из одной таблицы. Используются индексированные вьювы для того чтобы можно было реплицировать часть колонок в определенные таблицы).
Выделим левой кнопкой мыши поочередно каждую из них, нажимаем кнопку Article Properties\Set properties of Highlighted Indexed View Article. В открывшемся окне меняем свойство Destination object name на spr_kontr и kontr_bank соответственно (это таблицы, в которые в конечном итоге ).


В следующем окне выбираем «Tables referenced by views are required» и нажимаем Next. В следующем окне говорим, что мы не хотим создавать расписание для агента моментальных снимков, а хотим запустить его немедленно:
На следующем окне от нас ждут настроек учетной записи, с которой будет выполняться процесс агента моментальных снимков и агента чтения журнала. Нажимаем на Security Settings у Snapshot Agent’a (галочку Use the security settings from the Snapshot Agent не трогаем – пусть будет включена– не зачем вводить дважды одно и то же).
Указываем логин, от которого будет запускаться репликация у нас (исходная БД) и логин sa под которым будет осуществляться коннект к БД-распространителю и Next. В следующем окне ставим обе галочки (да, скрипт нам пригодится, правда только для публикаций с индексированными представлениями, а там, кто знает…) На следуем окне указываем, куда мы хотим сохранить скрипт и отмечаем, что мы хотим перезаписать файл, кодировку не трогаем. В последнем окне вводим имя публикации и читаем, все, что будет сделано. Если все в порядке, то жмем Finish. Если все получилось, то конечная картинка должна быть такой:
А в списке публикаций появилась kontr_publication. Теперь нам нужно удалить ее и пересоздать – это нужно только для views. С таблицами это делать не нужно. Для этого удаляем только что созданную публикацию из MSSQL Management Studio\ Replication\Local Publications, нажав на kontr_publication Правой кнопкой мыши и выбрав Delete. Теперь открываем созданный нами ранее скрипт и изменяем в нем слова indexed view schema only на indexed view logbased. После чего выполняем скрипт. Он ругнется на то что пароли получились пустые. Пускай. Сейчас зайдем в папку Local Publication (нажав на ней F5), выберем вновь появившуюся kontr_publication, зайдем в properties и на закладке Agent Security нажмем на кнопку Create Agent. В появившемся окне вводим windows и sql логины и пароли для доступа к БД-распространителю:
Нажимаем ОК. Все, публикация готова!

7. Создаем подписку
Прежде чем создать подписку необходимо обеспечить доступ SQL Server’a на удаленный SQL Server. Для этого выполняем следующие действия: Заходим на сервере-издателе в папку C:\WINNT\system32\drivers\etc, открываем файл hosts посредством блокнота и добавляем в него IP-адрес сервера, к которому мы коннектимся.

Теперь нажимаем правой кнопкой мыши на только что созданной публикации и выбираем New Subscriptions. В первом окне выбираем созданную ранее публикацию kontr_publication. Во втором окне указываем, что агент распространителя будет запускаться на издателе: В следующем окне выбираем подписчика. Для этого нажимаем кнопку Add Subscriber\Add SQL Server Subscriber, В открывшемся окне Connect to Server в строке server name пишем либо имя сервера, куда будет реплицироваться информация либо его IP-адрес; выбираем SQL Server Authentication и указываем в качестве логина sa, а в качестве пароля – пароль sa в БД, куда будут реплицироваться данные, нажимаем «Connect». Теперь в окошке появилась строка с именем сервера (отмеченная галочкой) и в качестве БД, куда будет реплицироваться информация, указана trade:
Переходим к следующему окну. Здесь от нас хотят, чтобы мы ввели информацию, которая будет использоваться для доступа к БД-подписчику. Нажимаем кнопку:

Поскольку ранее мы указали, что агент будет запускаться на распространителе, то в качестве логина и пароля, под которым будет запускаться агент, указываем имя пользователя, обладающего правами dbo и его пароль в БД-распространителе, а в качестве пароля к подписчику выбираем sa и его пароль в БД-подписчике:
Нажав «ОК», мы увидим, что строка заполнилась:
Нажимаем «Next». В следующем окне мы указываем, что нам не нужно задать расписание для агента и мы предпочитаем, чтобы он запустился сразу же:
На последнем окне мастера, определяющим инициализацию подписок, лучше оставить настройки по умолчанию: подписчик у нас будет инициализироваться тут же, как мы нажмем кнопку «Finish»:
В последнем окне нам показывают все то, что мы ввели при работе мастера создания подписки, дабы мы убедились, что нигде нет ошибки. Жмем «Finish». После некоторого раздумья, SQL Server должен сообщить, что все хорошо:
Список публикаций изменится - в нем появится новая подписка:

Эта же подписка появится и во второй базе.
Сделав изменения в нашей БД в справочнике КА и нажав на публикацию правой кнопкой мыши – View Snapshot Agent Status мы увидим, что все работает:
Аналогичным образом создаем подписку на все перечисленные выше таблички (только без ее удаления и восстановления из скрипта).